If you need help installing the plugin you may want to review our Install Guide prior to reading this user guide.
Product Type Support
Enable / Disable Offers for a Single Product
- In your WordPress admin panel go to Products and find the product you would like to adjust. Click to edit.
- From within the offers tab on the left side of the screen, click the check box to Enable Offers.
- Save your changes by clicking the Update button.
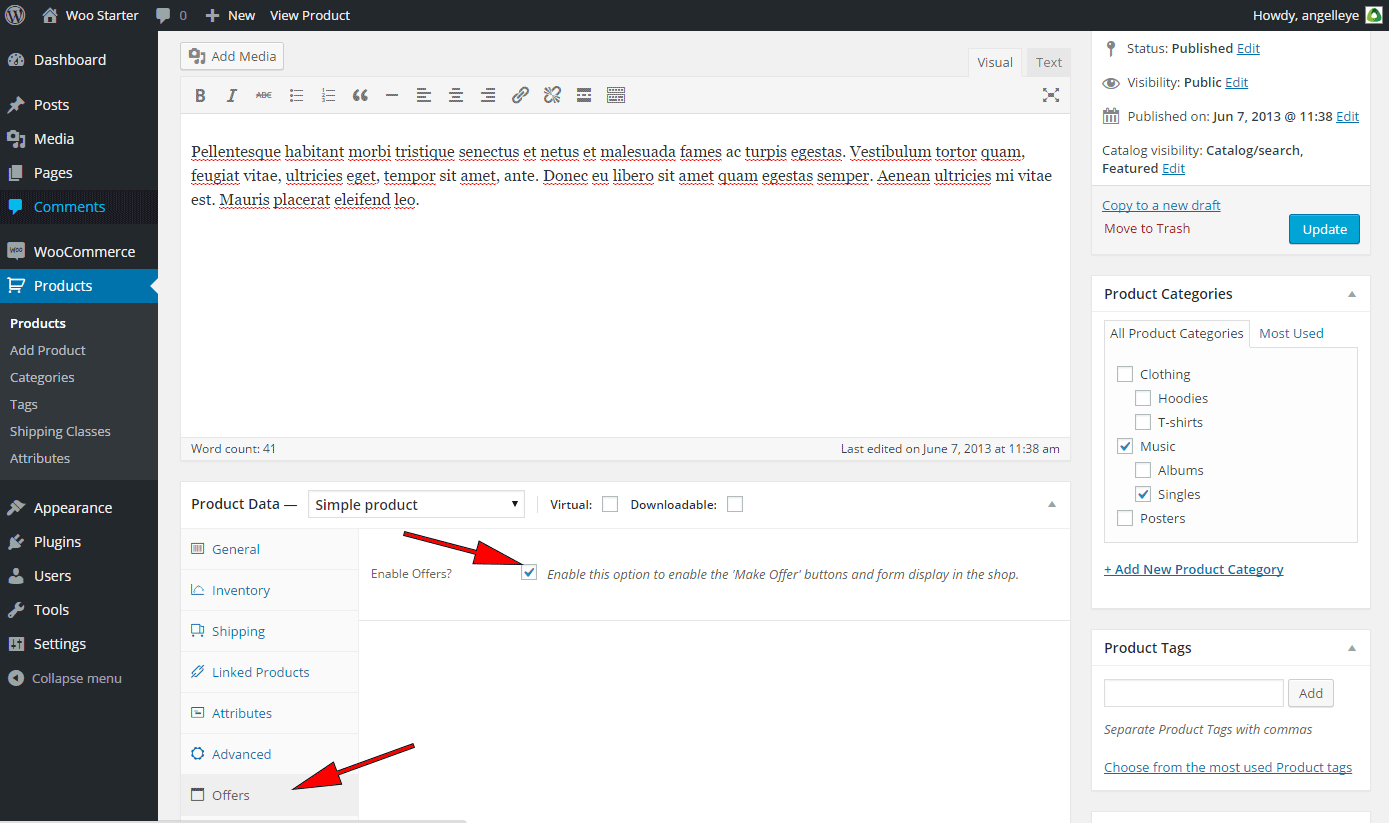
2. Check the box to Enable Offers for this product.
Enable / Disable Offers for Multiple Products
- In your WordPress admin panel click on the Products tab on the left.
- Check the box for each product you would like to adjust.
- Select the desired action from the “Bulk Actions” drop-down selection box.
- Click the Apply button to save the changes.
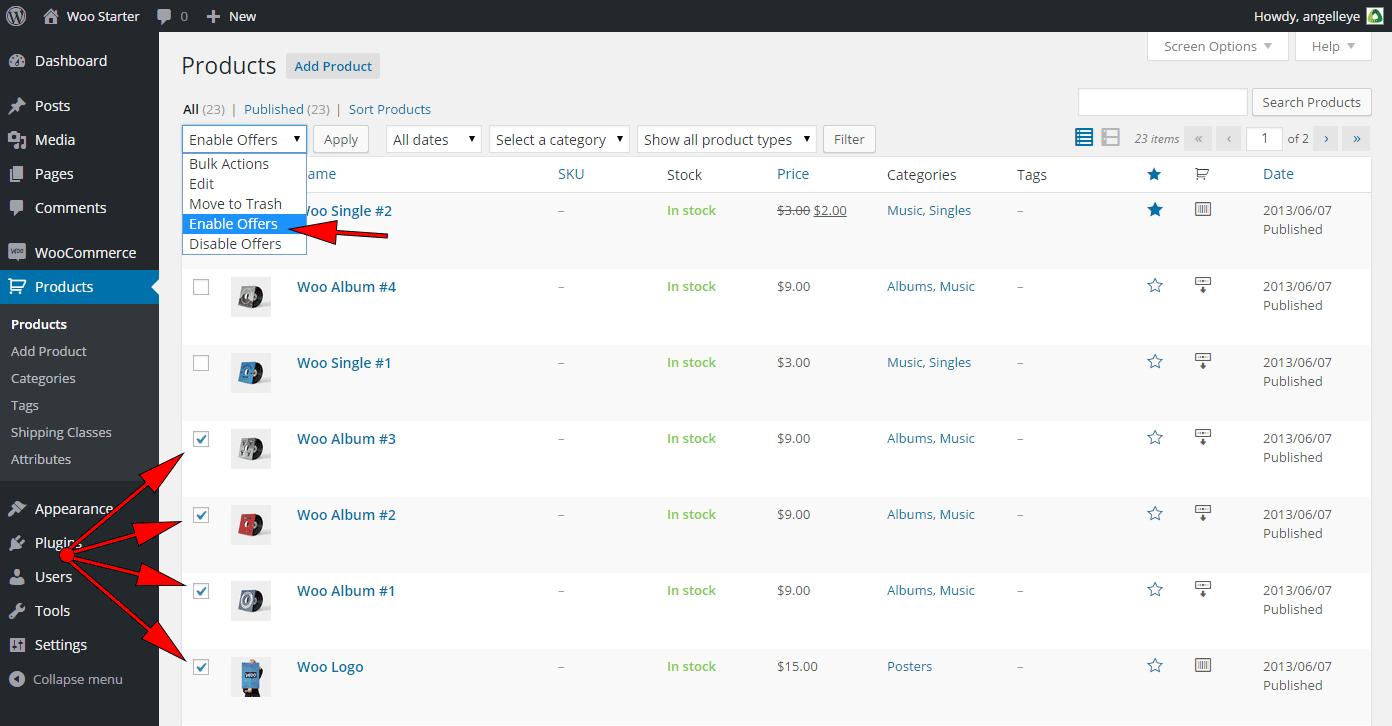
Easily enable / disable offers for multiple products from the Product list page in WordPress.
Managing Offers - List
- From the WordPress admin panel, go to WooCommerce -> Offers.
- You may use the action links provided to accept, decline, or submit a counter-offer.
- You may easily browse your offer history using the filter links at the top which will display only Pending, Accepted, Countered, Expired, Completed, or Declined offers.
- To view more details for an individual offer you can click on the email address for the offer.

Manage Offers List
Managing Offers - Details
- Product Details – This section provides details about the product that the offer is for, the regular price set in WooCommerce for the product, and any stock information that may be available for the product.
- Buyer Details – This section provides details about the potential buyer including their name and contact information.
- Original Offer – This section provides details about the original offer including the original quantity and price per unit offered.
- Counter Offer – This section provides the current quantity and price per unit. If the offer was simply accepted this will match the Original Offer details. If you have submitted a counter-offer this will be reflected accordingly here.
- Offer Note to Buyer – Add a note here when updating the status of the offer to have the note included with the offer email the potential buyer will receive. You can use this to explain to the buyer why you may have accepted, countered, or declined their original offer.
- Offer Status – This section allows you to set whether or not you are accepting, declining, or countering the offer. You may also set additional options here like a “final offer” or an expiration date for the offer.
- Offer Activity Log – This section is a running history of the offer details. Any status updates, notes, etc. will be included here for your review.
- Add Offer Note – This section can be used to add an additional note to the offer without updating the status of the offer. This is typically used for internal notes that only you will see, however, there is an option to email the note to the buyer.

Offer Details Screen
Managing Offers - Declined Offer Coupon
When you choose “Declined Offer” for the Offer Status the Coupon List drop down box will appear with all of your currently active coupons codes listed. Select any coupon code to have it included with the declined offer email notification the buyer receives.

Managing Offers - Auto Accept / Decline Offers
- From the WordPress admin panel, go to Products, and then enter the edit screen for the product you would like to adjust.
- Click on the Offers tab to view the offer options for the product.
- Check the box(es) to enable the Auto-Accept and/or Auto-Decline feature(s).
- Enter the percentage values for auto-accepting / auto-declining offers in relation to the original price.

This sample will automatically accept any offer that is at least 80% of the original price, and will automatically decline any offer that is 50% or less than the original price.
If you would like to adjust the auto-accept / auto-decline settings on multiple products at once, go to Settings -> Offers for WooCommerce -> Tools. Here you will find the bulk edit tool for updating the auto-accept / auto-decline features.

Plugin Settings - General Settings
- From the WordPress admin panel, go to Settings -> Offers for WooCommerce.
- Click on the General Settings tab.
- Check the boxes to enable the options you would like.
- Click Save Changes to submit your changes.

Plugin Settings - Display Settings
- From the WordPress admin panel, go to Settings -> Offers for WooCommerce.
- Click on the Display Settings tab.
- Adjust the options to suit your needs.
- Click Save Changes to submit your changes.
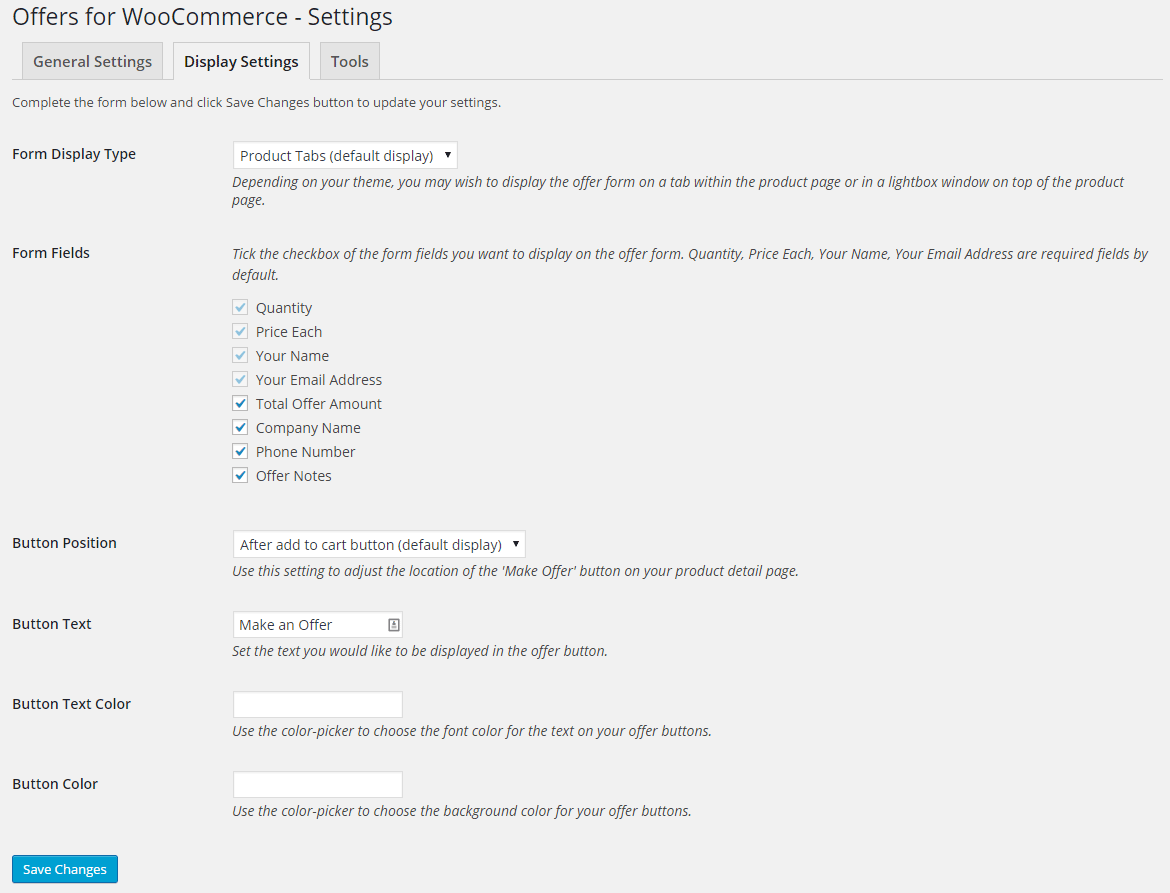
Offers for WooCommerce – Display Settings
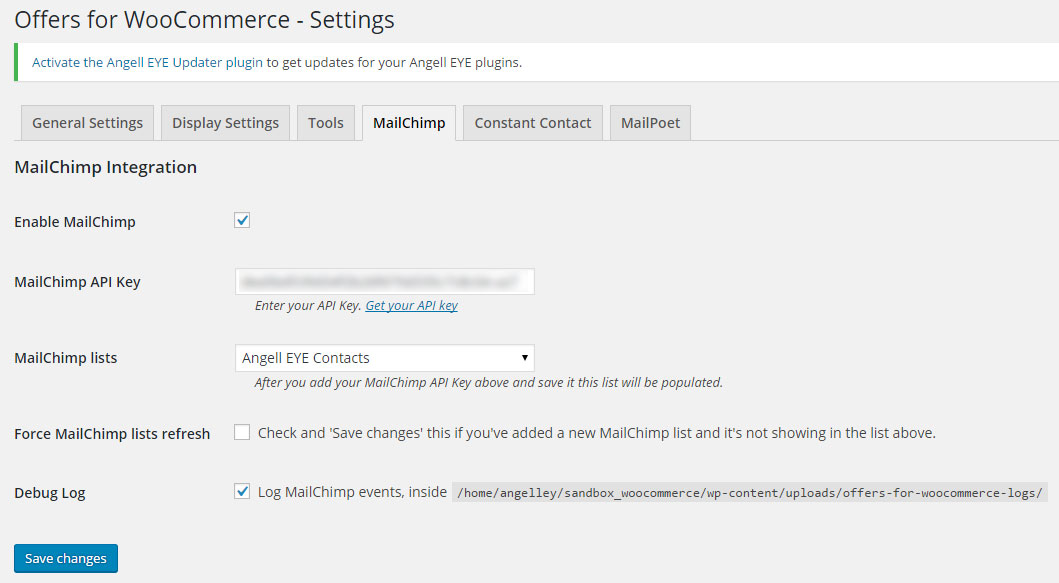
Plugin Settings - MailChimp / ConstantContact / MailPoet
- From the WordPress admin panel, go to Settings -> Offers for WooCommerce.
- Click on the tab for the newsletter management tool that you will be using.
- Enter your API credentials for the newsletter management tool (if applicable) and check he box to enable the feature.
- Click Save Changes to submit your changes.
Plugin Settings - Emails
- From the WordPress admin panel, go to WooCommerce -> Settings.
- Click on the Emails tab. Here you will see links for New offer, New counter offer, Offer received, Accepted offer, Declined offer, Countered offer, Offer on Hold, and Offer note. Click any of these to adjust the settings for that particular email.
- Adjust the options to suit your needs and then click Save changes to update the settings.

Offers for WooCommerce – New Offer Email Settings
Bulk Enable / Disable Offers Tool
- From the WordPress admin panel, go to Settings -> Offers for WooCommerce.
- Click on the Tools tab.
- Choose Enable Offers or Disable Offers from the Action drop-down list.
- From the Target drop-down option, choose All Products, Featured Products, or use the Where option to define filters for which product(s) should be enabled/disabled.
- If you chose “Where” in Step 4, then you’ll choose the filter option and enter your filter value. In this sample screenshot we are enabling offers for all products where the price is greater than 99.99.
- Click the Process button to run the bulk update accordingly.

Offers for WooCommerce – Bulk Update Tool
Send Myself a Copy of Custom Notice Emails
To do this, add the following code snippet into your theme’s functions.php file (or wherever you are comfortable placing it.)
wc_countered_offer_email

/**
 * Function sends BCC of accepted and countered offers
 *
 * @param string $headers The default headers being used
 * @param string $object  The email type/object that is being processed
 */
function add_bcc_to_certain_emails( $headers, $object ) {

	// email types/objects to add bcc to
	$add_bcc_to = array(
		'wc_accepted_offer',	// Accepted Offer message
		'wc_countered_offer',	// Countered Offer message
		);

	// if our email object is in our array
	if ( in_array( $object, $add_bcc_to ) ) {

		// change our headers
		$headers = array(
			$headers,
			'Bcc: NAME ' ."\r\n",
			);
	}

	return $headers;
}
add_filter( 'woocommerce_email_headers', 'add_bcc_to_certain_emails', 10, 2 );
Developer Hooks
Looking for Live Help?
Schedule a live meeting with Drew Angell, PayPal Certified Developer, and get all of your questions or concerns answered.

Featured PayPal Products and Services
-

PayPal for WooCommerce
FREE! -
WooCommerce Multiple PayPal Accounts Plugin
FREE! -
PayPal Shipment Tracking for WooCommerce
$49.99 -
Offers for WooCommerce
$59.99 -
WordPress PayPal Invoice Plugin
$20.00 -
PayPal Webhooks for WordPress
$79.99 -
Sale!
PayPal IPN for WordPress
Original price was: $59.99.$49.99Current price is: $49.99. -
WordPress PayPal IPN Forwarder
$19.99


Hi – where can i find the file to rename the fields on the form?
That wouldn’t be recommended because future updates would overwrite. We could consider adding filter hooks to allow you to change those easily. I’m just curious why you’re needing to change the field names..??
Hello. Where can I change the language?
You can use the included .pot file to setup a translation for your language.
Hi, might descrive the detail process between client admin , indicating the action to take ?
Ex. I won’t use the percentage minimal to auto accept and when I get an agreement with client I put the offer in state “accepted”. THEN WHAT HAPPEN now ? would client receive a mail with a link to proceed to checkout ? Actually he receive nothing !
Yes, they would get an email with a link to checkout for the accepted offer. If they didn’t get the email, but you got yours, they’ll need to check their spam. Everything gets sent at the same time.
You could submit an offer with your own email address and then you’d be able to see both sides of the notifications.
Excellent Plugin, however my client wants to REMOVE the QUANTITY checkbox option. We are using it for a single USED, one of a kind Product.
In the WooCommerce product settings you can specify that the product is “Sold Individually”. This is found under the Inventory tab in the product update screen. If that option is enabled for a product it would not display the QTY field.
Is this plug-in work with WordPress version 4.4.2
and Woocmmerce 2.5.3 with Woocommerce market place
No. You will need to update WordPress and WooCommerce in order for this plugin to work well. I would recommend it anyway. 🙂
Hi, I want to findout the users list who all have offers. Is it possible from front end?
I’m using this plug-in.
Thanks in adavnce…
I am not sure I understand what you are asking for. Can you please explain that a little more?
Hello,
I’m using your pluggin “offer for woocommerce” and it’s just wouahou !!! So, I’d need to translate the words “offers are currently pending.” witch appears in the front end in english…I use loco translate but I don’t find these words…even if I search only currently for example beacause of one or more offers…
So how can I do it ?
Thanks a lot in advance and sorry for my approximative English…Hope you understand…
Have a nice day !!!
For information, I’m building my website in a special file of my web provider and for this reason, it has no visibility.
I’m not familiar with “loco translate”..?? Is that another plugin? Does it use the pot file included with the plugin? Have you tried translating with that method?
How can make an italian translation?
Are you familiar with using the pot files to create a translation for the plugin?
Why is it then the plugin is activated I lose all access to WP-ADMIN?
Can you enable WP_DEBUG in your config file to see if you get an error in the admin panel? Or can you check the PHP error logs?
Hello to all,
I downloaded this plugin for a website in WordPress.
But I can not get it to work.
When I go to the button and compile the data, then nothing tells me and everything disappears.
Why? What should I do?
It’s urgent!
Thanks to who will answer me.
Michael
I’m afraid I don’t understand the issue you are having. Are you saying you cannot get the plugin to activate?
Yes, I can not, nothing works.
When I compile I should receive an offer via email and also from within the site but nothing.
Can you solve the problem? Thank you!
Hi, do you have a shortcode list?
Specifically, I am looking for a shortcode for the Dashboard (My Account) section for users, so that they can view their Offers activity.
Thanks
If you’re signed in to an account where you’ve submitted offers then you would see these “Recent Offers” show up under your My Account page already. Are you saying you aren’t seeing this, or are you trying to display the offers somewhere else?
Hello,
Great plugin, thanks a bunch for it!
One question – is there a way to set a timer/delay for automatic approve/deny replies so that they don’t appear automated?
Many thanks.
Jane
Hi Jane. Glad you like the plugin overall! That is not something that’s currently available, but I can add it to our list for a future update.
The plugin works fine, but I am trying to give permissions to Editors and Shop Managers to be able to add it to products and manage offers.
I can only seem to get it to work for Administrators. What am I missing? Thanks
I would look into some 3rd party user role / capability manager plugins. Those should be able to do what you’re wanting.
Andrew,
I just installed this plugin. It doesn’t display the ‘Make an Offer’ button in the product page. My products are no in Home page or Shop page. As I read in the general settings that it will appear in products which are on either Home page or Shop page, I used shortcodes to show products in the home page. I still doesn’t work.
Any ideas?
Cheers!
FIXED IT!! Sorry!!!!
I didn’t authorize it on the product page! Works alright!
Cheers!
Glad you got it worked out!
Hello,
Wonderful Plugin! We use this plugin on a site that sell items nationwide with “Free Shipping”. These items could need freight shipment as well. It is important to know where the customers shipping zip code is located to make a decision to either accept or reject an offer. Is there a way to add a field that would require a customer to input “Zip Code” similar to how name and Email are required? Likewise, we do not use the phone number field, could we just rename this “zip Code”? Thanks for your help.
Hi Ted,
Glad you like the plugin! We have action hooks available so you can add your own custom fields. This is where you would add a zip code field if you want it. At the bottom of that page is a sample script you can download that shows you how to use the hooks to add your own fields. That should do the trick for ya!
We have the offers plugin and we are testing it’s use.
I noticed one thing when I tried a test. I was below the % for auto reject and I got the first email that said my offer was rejected.
Then I got a second email (essentially at the same time as the first) that my offer was submitted. in the Admin I made a counter and I rec’d a 3rd email with the counter offer. I accepted the counter offer and immediately was sent to the cart with the item at the agreed upon price. All very good, except if an offer is auto-declined, shouldn’t it die right there? We do not want an email sent to the Admin if the auto-decline has been triggered. is there a way to configure this with the settings?
Hmmm…yes, if declined that should be the end of it. Thanks for laying out this detail. I’m going to create an issue for this in our GitHub repo so we can look to make adjustments in our next update.
it is a great plugin. all functions are working but offer mails are going to spam folder. i connect my mailchimp api key successfully,add emails in woocommerce settings mails. but offer mails are all going to spam folder. how to solve it? my other order mails successfully going to inbox folder through mailchimp.
When it hits your spam can you see any info your email client about why it was labeled as spam?
Hello,
Offer tab is functional but no emails are coming through and no offers are appearing on the manage offers page.
I have checked woo commerce email settings and added another email just to be sure without success. I am receiving order emails from woo commerce as normal.
Please advise as to next steps I should try. I have left it installed for you to try.
Thanks
Can you provide a URL where I can test? It sounds like you’ve got some sort of a jQuery conflict happening with another plugin or your theme.
Still no response to this issue?
On this comment form there is a space for the website URL. It was previously supplied. I’ll fill it in again.
Hi there, just to let you know that it crashes my website. I have the latest PHP, WP and WC. The theme is shapely. I would really love to try your plugin.
Can you help? thanks
Can you provide the actual PHP error you are getting?
Hey Andrew,
i add a new Product with a disbaled offers checkbox.
On the Product site is the button still active – with a wrong URL. The button opens a complete different product.
Can you help?
Thanks!
Kind Regards from Germany
I’m a little confused by what you are saying here. You have Offers disabled on the product, but it’s still showing up..?? Can you provide a link to a product where the issue is happening?
Yes, this is my same reaction…
Sure, the URL is:
http://www.uhrenratgeber.net/shop/produkt/zeitwaage-weishi-1000/
WordPress, WooCoomerce and your Plugin are on the latest Version
Hi, I installed your offer plugin to my website but I’m having this error on telephone field. Every time the customer entered an invalid phone no., it can’t go on with the other input fields.
I’m a little confused. Are you saying that even valid phone numbers are getting shown as invalid?
Just to say I am also seeing that too – just installed this today and have removed that option from the form for now. I tried entering the phone number with and without a space and also it gave me the personal information drop down icon to select my phone number which I tried. All came back with invalid.
Not sure I understand what you’re reporting here. Please submit a ticket here and include screenshots if you can.
Hi, I uploaded woo commerce offer to my test site but I am getting an overlap when viewed on PC from the Make offer button and 1 offer is currently pending box. But no overlap when viewing on a mobile device. No matter where I put the Make offer button via “button position”: To the right, after add to cart, before add to cart etc…I am in an overlap of some sort with my theme. How can I position the button so it appears with no overlap as it is doing via mobile devices but not on a pc browser
Can you provide a screenshot of what you’re seeing, or send a link to the URL where I can see for myself?
Hi Andrew,
I am having trouble getting the button text to behave. On the product page it is displaying vertically – please see the web link.
Meanwhile, on the category page it reads ok but does not line up centrally under the Add to Cart button so looks strange sitting off to the left. Any clues how I can correct that please?
Thanks!
This is something that would need to be adjusted in your theme’s CSS. There seems to be a conflict with something else your theme is doing in CSS that needs to be fixed to work well with our buttons. If you want to submit a ticket here we can try to work with you on this, but it may require a premium support order.
is offer compatible with wc marketplace
The Offers plugin works with any WordPress site, of course, but it may not be 100% compatible with WC Marketplace. I’m not familiar with that plugin so I cannot say for sure. I know we did have to make a separate extension plugin for WC Vendors compatibility, and we’ve had requests to do the same for the Dokan Vendors plugin. It sounds like WC Marketplace may be similar..??
hello,
I am using this plugin, this is the excenlte plugin for shop, I am just 2 problem have a seen,
1. How to edit Offer Sent default message “Offer Sent! Your offer has been received and will be processed as soon as possible.”
2. Offer receive, Accept, etc. email received always in junk/spam folder, how to fix it.
Hi Azhar,
It would be best to post these types questions/comments to our help desk. Please do that and our team will take care of you one way or another. Thanks!
Wc vendor offers for woocommerce wc vendor add-on plugin issue : The payment process after changing the offer status does not display. How do people pay the offered amount?
When an offer is accepted the buyer will get an email notification. This email will include the break-down of the accepted offer price with a button to buy the item at the accepted price. When you click that button it loads the order with the accepted offer price so they can complete purchase.
Hi,
I’m using your great plugin. It’s awesome.
Everything is fine in chrome and mobile browser,but the function for ‘submit button’ in IE doesn’t work.
When I push the submit button in other browser, it says to me ‘Offer Sent! Your offer has been received and will be processed as soon as possible’
But in IE browser, it doesn’t show me any message and of course mail doesn’t sent.
Please let me know how to fix it.
There is a reason that Microsoft killed IE, you know. 😉
We don’t have any other reports of this, so it could be a conflict with something unique on your site like a specific combination of plugins, or something in the theme. Are you getting any sort of JavaScript errors or anything on the page when you try to submit? Does the button trigger at all, or does it just “do nothing”?
Hi,
my clients wants to disable the “price each” field, however I can’t tick it off in the plug-in settings. Is there any way to disable it?
At the product level in WooCommerce, enable the option for “Sold Individually”. I think that will give you what you’re after.
Good morning Andrew,
Is it possible to bid on the total cart?
With kind regards,
Thomas
Hi Thomas,
Right now, no, that feature is not available. We have had thoughts of creating this as a premium extension to the plugin, but it could be awhile (if ever) before we get to that. All depends on the demand. 🙂
Good morning Andrew,
Last question, here in europe we use the next price format:
€ 1.500,00 instead of € 1,500.00
How can we change this?
Kind regards,
Thomas
It should be working based on the currency set in WooCommerce. Are you seeing otherwise?
How to translate the text from english to french ?
Hi Christian,
There is a translation template file included with the plugin. Are you familiar with using that to translate WordPress plugins in general?
Hi
When I set the display setting to LIGHTBOX and then press the Make an Offer button, nothing happens. If the display setting is set to defaul, then the Make an Offer form is just displayed in the description. How can I fix this? I just purchashed the plug-in 🙁
It sounds like you have some sort of conflict with another plugin or your theme. Can you try disabling other plugins and switch to a different theme temporarily to see if the problem goes away? If so, then re-activate each one-by-one until the problem comes back to find the culprit. If you can find the conflict then we can look to reproduce it and see if the problem is on our side (in which case we’d fix it) or their side.
Hello,
My first customer is not receiving the offer accepted emails and there does not appear to be a way to see the automated communications. I did check and the offer accepted emails are enabled. I did also try to add the provided code so that I receive the automated emails as well, but there appears to be an error in the code. Can you help?
I’m sorry for the delay replying here. Did you ever submit a ticket to our actual help desk at http://www.angelleye.com/support? That’s the best place for quicker help. If you’re still struggling with this please submit a ticket there and my team will get you taken care of. Thanks!
Is this plugin compatible with WCFM Front-End Ultimate and WCFM Multivendor?
It’s not currently, but it’s in our backlog and I also funded $100 towards it on our brand new GitCommits platform: https://app.gitcommits.com/issue/wcfm-compatibility
If you want to throw $100 (or whatever you can afford) towards it and help find others interested in the same feature that can contribute as well, eventually the bounty will get large enough that I can have my team do it, or some other developer out there could decide to do it for us and claim the bounty.
Otherwise, it’ll sit in our backlog until we get enough demand to invest the cash into development and hope to get our return afterwards.
If I accept the offer. Will the offer be only available to THAT person? I bought Make an Offer by WooCommerce and that plug-in is awful. If I click ACCEPT it lowers the price so anyone can buy it. Only the person making offer should be able to purchase. Can you confirm?
Yes, that is correct. Only the person who you sent the accepted offer to can accept it at that price. This should do exactly what you want! 🙂
Could you explain what the “On Exit Only?” feature does. I can’t find anything in the docs relating to that.
Typically the offer button shows up on the page, and when you click the button it displays the form to enter your offer details. “On Exit Only” would not show the offer button, but instead would pop-up the Make an Offer dialog if you move your cursor to the top of the browser page like you were about to close it or move to a different site/tab. You see this often with things like “Wait, before you go, take a look at this deal…” We did the same thing, but it simply provides the ability to make an offer. Hope that helps!
This plugin does almost exactly what we need. However, we don’t want this on product page, we want it on the shop page so they get the pop-up there, as opposed to the product page.
This is what the client wants, I’m not the one to ask for that….
before I hack this plugin up and try and make that happen, is there a shortcode to produce the correct button that triggers the pop-up?
There is already an option in available in the settings to display the offer button on the shop page. Please check that again, and if you can’t find it submit a ticket to the help desk and we’ll help you more directly.
Thanks!
Drew
Yes, I have that. However it is adding this query string to the end of the url for the button: ‘?aewcobtn=1’.
When you land on the product page, it gives you this alert: ‘Please select some product options before making offer for this product.’
Without the query string, this problem does not occur.
I’m assuming its a setting but I cannot figure out which one. Do you know which one it s?
Ah, I think this is related to another general bug we’re working on related to variable products. We had a report that trying to submit a counter offer for a variable product causes this same validation error about product options. I have updated that ticket to include that it also happens when making an offer from the Shop page. We’re working on it, and we’ll have an update published ASAP!
Gotcha. When I first set it up, I don’t think it was doing this, but then started playing with settings, then it showed up.
I wish I could remember the order of events.
Thanks I’ll keep an eye on this…