Introduction
PayPal Plus is an add-on product for accounts based in Germany, Mexico, and Brazil that provides PayPal payments and direct credit card payments on your website.
This guide will show you how to create a PayPal app for use with the plugin, and then configure the plugin to enable PayPal Plus on your WooCommerce website.
If you need help installing the plugin, take a look at our install guide before moving forward here.
NOTE
It is recommended that you create a PayPal sandbox seller account prior to completing this guide if you do not already have at least one created in your PayPal developer account.
Video Overview
Setup Steps
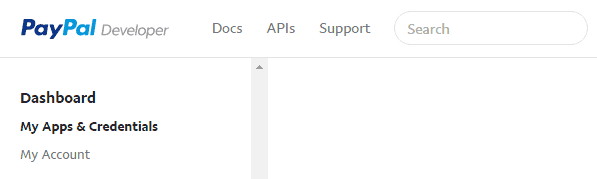
1. Login to your PayPal developer account dashboard.
- Login to https://developer.paypal.com using your live PayPal account credentials.
- Then click Dashboard to enter your PayPal developer dashboard.
WooCommerce PayPal Plus PayPal Developer Login
2. Click My Apps & Credentials
- On the left side of the dashboard screen, click My Apps & Credentials.
WooCommerce PayPal Plus REST App Credentials
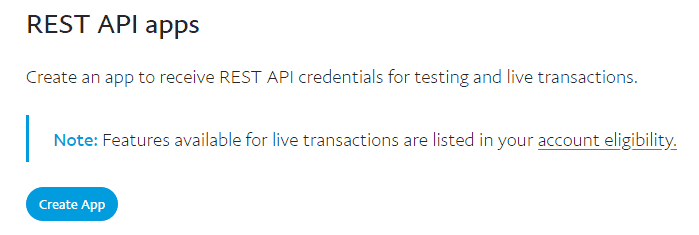
3. Create a REST Application
- Scroll down to the REST Apps section of the page.
- Click the Create App button.
- Enter a name for the new app, and choose a sandbox account to associate with it.
- Your live account is already associated with this app by way of logging in to the PayPal developer dashboard.
- Click the Create App button again to officially create the new app.
- NOTE: If you have already created a rest app you can click into your app to view / edit details.
WooCommerce PayPal Plus REST Create App

WooCommerce PayPal Plus REST Create App
4. Configure application settings and save.
- Select Sandbox or Live depending on which version of your app you would like to update.
- The sandbox is used for testing purposes.

PayPal REST API App Sandbox / Live Setting
- Under the API Credentials section you will see your Client ID.
- This will be copied / pasted into the plugin settings in WordPress later, so you may want to make record of it now.

PayPal REST App Client ID
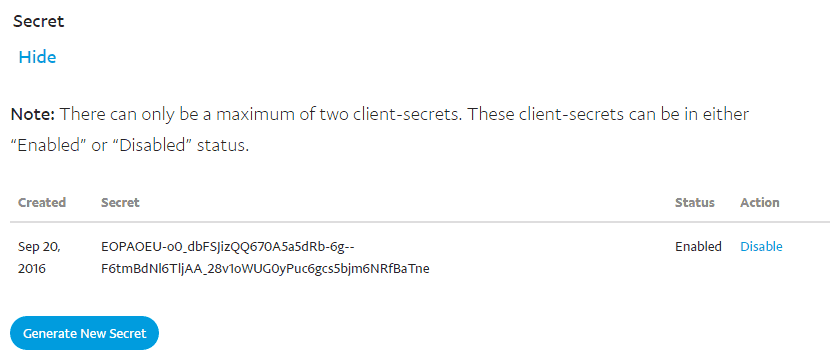
- Click the Show link under Secret to display the Client Secret credentials section.
- If you do not already have a Secret displayed here, click the Generate New Secret button.
- This will be copied / pasted into the plugin settings in WordPress later, so you may want to make record of it now.
PayPal REST API Secret ID
- Review and adjust the remaining application settings to suit your needs.
- Click Save to finalize the creation of the app.

PayPal REST API App Settings
5. From the WordPress dashboard, navigate to WooCommerce -> Settings

6. Click on the Checkout tab, and then click PayPal Plus.

WooCommerce PayPal Plus Checkout Settings
7. Configure the PayPal Plus settings
- Make the necessary adjustments to the WooCommerce PayPal Plus settings.
- Click Save to save your changes.
Enable / Disable
Check this box to enable the payment gateway. Leave unchecked to disable it.
Title
This controls the label the user will see for this payment option during checkout.
Description
This controls the description the user will see for this payment option during checkout.
PayPal Account Country
Set this to the country that your PayPal Plus account is based in.
- This is important because the checkout experience for different countries varies slightly.
PayPal Sandbox
Check this box to enable test mode so that all transactions will hit PayPal’s sandbox server instead of the live server. This should only be used during development as no real transactions will occur when this is enabled.
Client ID and Secret ID
- Copy and paste your Client ID and Secret ID from your PayPal developer application created above.
- NOTE: These fields will change to “sandbox” fields vs. “live” fields depending on whether or not PayPal Sandbox is enabled or not. Make sure you are filling in the values into the correct fields!
Invoice ID Prefix
This allows you to set a value to be used as the prefix on invoice IDs generated by WooCommerce.
This can help to resolve duplicate invoice issues that may arise if you’re using PayPal on multiple websites where the same invoice IDs can get used. A prefix is required to avoid declined payments when this happens.
Cancel URL
This is the URL PayPal will send users to if they cancel / close the PayPal Plus checkout experience prior to completing their payment.
Brand Name
This controls what users will see for the brand / company name on PayPal review pages.
PayPal Plus Checkout Brand Name
PayPal Checkout Logo (190x60)
Here you may add the URL of an image you would like to display as the logo on the PayPal Plus Checkout pages.
- If you have “Force Secure Checkout” enabled in WooCommerce, which means you must have a valid SSL certificate installed on your site, then you will be able to simply upload an image using the WordPress media manager.
- If you do not have an SSL certificate for your site you may upload your image to any SSL image service and simply copy/paste the URL here. We recommend SSLpic for this service.
Auto Cancel / Refund Orders
PayPal Seller Protection can be an important feature to help protect you from fraud. You may use this setting to automatically cancel and refund an order if it is not covered by PayPal Seller Protection.
- Do not cancel any orders.
- This is the default setting and will not automatically cancel / refund any order.
- Do *not* have PayPal Seller Protection
- This will automatically cancel and refund any order that is not covered by PayPal Seller Protection.
- Do *not* have PayPal Unauthorized Payment Protection
- This will automatically cancel and refund any order that is not covered with unauthorized payment protection.
Legal Note for Pay Upon Invoice Payments
PayPal Plus provides a “Pay Upon Invoice” option which allows a person to complete checkout, and then submit payment later.
This note will be displayed to buyers on the order receipt / thank you page as well as in email notifications.
Ratenzahlung
If you have Ratenzahlung enabled on your PayPal Plus account you will need to enable it here so that it will be included in the PayPal Plus iFrame during checkout.
NOTE: PayPal Ratenzahlung for WooCommerce is available as a separate plugin.
Debug Log
Check this box to enable logging for PayPal Plus Checkout API calls. These logs will be saved under /wp-content/uploads/wc-logs/.
Need Help?
If you are struggling to get things working after reviewing this setup guide, please create a support ticket and we can help you directly.
Featured PayPal Products and Services
-

PayPal for WooCommerce
FREE! -
WooCommerce Multiple PayPal Accounts Plugin
FREE! -
PayPal Shipment Tracking for WooCommerce
$49.99 -
Offers for WooCommerce
$59.99 -
WordPress PayPal Invoice Plugin
$20.00 -
PayPal Webhooks for WordPress
$79.99 -
Sale!
PayPal IPN for WordPress
Original price was: $59.99.$49.99Current price is: $49.99. -
WordPress PayPal IPN Forwarder
$19.99


Is it possible to have only Paypal Plus integrated in the checkout process? I have the problem that Paypal Plus is a seperate billing method and not my whole billing system. So I have to choose at first “Paypal Plus” and then I can chose my payment method. I would like to have only the Paypal Plus Window with my payment methods.
Kind regards,
Simon
Hi Simon,
We are about to release an update (1.0.2) that adds the option to use the Plus iFrame in place of the general list of WooCommerce payment gateways instead of just listing it along with the other gateways. When you do that any other gateways you have enabled in WooCommerce get injected into the iFrame.
We should have the update released within a week.
I’m using “Paypal Plus invoice service” in Germany.
How can I integrate the PayPal Plus account information for the customer into ouer PDF-invoice?
Kind Regards,
Lennart
I’m not sure I fully understand what you are trying to do. Can you please elaborate on that for me? Are you building your own custom PDF invoices? Are you using a plugin like WooCommerce PDF Invoices and Packing Slips? Please submit a ticket here and provide these details. Thanks!
Hi,
i have made everthing like in the setup guide. But if i go to the checkout page and i select paypal plus there is a big red warning “Access is not allowed”. What do i wrong?
Hi Michael,
It sounds like you don’t have PayPal Plus fully approved and active on the PayPal account. Can you please verify this with PayPal? I’ve even seen cases where they have to turn it off and back on again in order for it to accept the setting and open it up. Please give that a try and you still have problems you can submit a ticket here and we can help you more directly.
When I check “Replace checkout page payment gateways with PayPal Plus iFrame.” the checkout button on the checkout page is greyed out and unclickable. So actually noone can purchase anything.
If I leave it unchecked and have the radio button solution (which doesn’t look to nice…), everything is ok. You got any idea why I got this problem?
Are you running Woo Germanized? I think you’re running into a conflict we have with that plugin that we are aware of and will be fixing in the next update, which we’ll be releasing ASAP!
It is possible to specify the payment fee as percentage like “1%” or can this only be a fixed price?
I am not sure what you’re referring to. Can you please elaborate on this?
Hi, when I set the “Replace checkout page payment gateways with PayPal Plus iFrame” I still see the option, but when I click it, nothing is loaded at all. Also I would like to fully remove the “payment option” list and only see the paypal plus options. Any help here?
Thanks Peter
It sounds like you may have some caching / CDN service that is conflicting. Can you make sure to clear out any such services after enabling the option to replace the checkout page gateways with the Plus iFrame? That should give you what you’re describing you want.
hi,
is your plugin support woocommerce subscription and all the advance Features like:
EXTENSION MULTIPLE SUBSCRIPTIONS RECURRING TOTAL CHANGES PAYMENT DATE CHANGES CUSTOMER PAYMENT METHOD CHANGES STORE MANAGER PAYMENT METHOD CHANGES
PayPal Plus does not support that stuff, unfortunately. Our regular “PayPal for WooCommerce” plugin does support those things, but you have to have Billing Agreements enabled on your PayPal account.
Hi,
can i juse paypal express checkout on my mini-card or produckt page with this plugin?
Yes, you can add the PayPal buttons to product pages, the cart page, and the mini-cart.