Introduction
PayPal now offers a vast array of payment processing options to both consumers and merchants. Outside of Payments Pro, though, users must have a PayPal account before they can do much of anything with the platform.
Like anything else, this process involves a registration form where one provides all of the information necessary to create a new PayPal account. PayPal has done an excellent job of providing plenty of resources to accomplish this task, but according to the Google AdWords Keyword Finder Tool there are millions of people searching for “how do I get PayPal” or “what is PayPal” every single month. This evidence shows that there is still quite a bit of confusion out there surrounding the payment system we’ve all grown to love.
Since the release of the Adaptive API’s PayPal has opened up the ability for developers to integrate this process of creating accounts and preparing to use PayPal into their own applications. Similar to Express Checkout, Adaptive Payments, and Permissions, the Adaptive Accounts API allows us to gather everything we need from the user in our own creative way. We can then simply redirect the user over to PayPal to create their password and accept the PayPal user agreement, at which point they’ll be returned back to the application.
In this article I’ll walk you through API’s that allow you to complete each of the main steps necessary for a user to get up-and-running smoothly with PayPal.
- Create an account.
- Add a bank account for verification.
- Add a credit card for address confirmation.
As usual, I’ll be using my PHP class library for PayPal in these examples, so it will be helpful if you’re familiar with that, but it’s not required to follow along.
CreateAccount API
The first thing we’ll cover is creating a new PayPal account using the CreateAccount API. I’ll leave the creativity and user input design up to you so we can get straight to the technical guts of this thing.
There are lots of optional request parameters we can use when creating new accounts via web services. For a basic, personal account you might only include the user’s name and address information. With a business account, though, you’ll provide additional information about the business itself, and you can even go as far as providing details about individual stakeholders within the business.
Let’s take a look at some sample code for CreateAccount using the PHP library.
<?php
// Include required library files.
require_once('../includes/config.php');
require_once('../includes/paypal.class.php');

// Create PayPal object.
$PayPalConfig = array(
	'Sandbox' => $sandbox,
	'DeveloperAccountEmail' => $developer_account_email,
	'ApplicationID' => $application_id,
	'DeviceID' => '',
	'IPAddress' => $_SERVER['REMOTE_ADDR'],
	'APIUsername' => $api_username,
	'APIPassword' => $api_password,
	'APISignature' => $api_signature,
	'APISubject' => $api_subject
);

$PayPal = new PayPal_Adaptive($PayPalConfig);

// Prepare request arrays
$CreateAccountFields = array(
	'AccountType' => 'Premier', // Required. The type of account to be created. Personal or Premier
	'CitizenshipCountryCode' => 'US', // Required. The code of the country to be associated with the business account. This field does not apply to personal or premier accounts.
	'ContactPhoneNumber' => '555-555-5555', // Required. The phone number associated with the new account.
	'HomePhoneNumber' => '555-555-5555', // Home phone number associated with the account.
	'MobilePhoneNumber' => '555-555-4444', // Mobile phone number associated with the account.
	'ReturnURL' => $domain.'return.php', // Required. URL to redirect the user to after leaving PayPal pages.
	'ShowAddCreditCard' => 'true', // Whether or not to show the Add Credit Card option. Values: true/false
	'ShowMobileConfirm' => '', // Whether or not to show the mobile confirmation option. Values: true/false
	'ReturnURLDescription' => 'Home Page', // A description of the Return URL.
	'UseMiniBrowser' => 'false', // Whether or not to use the minibrowser flow. Values: true/false Note: If you specify true here, do not specify values for ReturnURL or ReturnURLDescription
	'CurrencyCode' => 'USD', // Required. Currency code associated with the new account.
	'DateOfBirth' => '1982-04-09Z', // Date of birth of the account holder. YYYY-MM-DDZ format. For example, 1970-01-01Z
	'EmailAddress' => 'sandbox2@angelleye.com', // Required. Email address.
	'Saluation' => '', // A saluation for the account holder.
	'FirstName' => 'Tester', // Required. First name of the account holder.
	'MiddleName' => '', // Middle name of the account holder.
	'LastName' => 'Testerson', // Required. Last name of the account holder.
	'Suffix' => '', // Suffix name for the account holder.
	'NotificationURL' => $domain.'paypal/ipn/ipn-listener.php', // URL for IPN
	'PreferredLanguageCode' => '', // Required. The code indicating the language to be associated with the new account.
	'RegistrationType' => 'Web', // Required. Whether the PayPal user will use a mobile device or the web to complete registration. This determins whether a key or a URL is returned for the redirect URL. Allowable values are: Web
	'SuppressWelcomeEmail' => '', // Whether or not to suppress the PayPal welcome email. Values: true/false
	'PerformExtraVettingOnThisAccount' => '', // Whether to subject the account to extra vetting by PayPal before the account can be used. Values: true/false
	'TaxID' => ''	// Tax ID equivalent to US SSN number. Note: Currently only supported in Brazil, which uses tax ID numbers such as CPF and CNPJ.
);

$Address = array(
	'Line1' => '1503 Main St.',
	'Line2' => '376',
	'City' => 'Kansas City',
	'State' => 'MO',
	'PostalCode' => '64111',
	'CountryCode' => 'US'
);

$BusinessAddress = array(
	'Line1' => '123 Test Ave.',
	'Line2' => '',
	'City' => 'Grandview',
	'State' => 'MO',
	'PostalCode' => '64030',
	'CountryCode' => 'US'
);

$PrinciplePlaceOfBusinessAddress = array(
	'Line1' => '1503 Main St.',
	'Line2' => '376',
	'City' => 'Kansas City',
	'State' => 'MO',
	'PostalCode' => '64111',
	'CountryCode' => 'US'
);

$BusinessStakeHolder = array(
	'DateOfBirth' => '1982-04-09Z', //YYYY-MM-DDZ (ie. 1970-01-01Z)
	'FullLegalName' => 'Tester Testerson',
	'Salutation' => '',
	'FirstName' => 'Tester',
	'MiddleName' => '',
	'LastName' => 'Testerson',
	'Suffix' => '',
	'Role' => 'CHAIRMAN',
	'CountryCode' => 'US'
);

$BusinessStakeHolderAddress = array(
	'Line1' => '1503 Main St.', // Required. Street address.
	'Line2' => '376', // Street address 2.
	'City' => 'Kansas City', // Required. City
	'State' => 'MO', // State or Province
	'PostalCode' => '64111', // Postal code
	'CountryCode' => 'US'	// Required. The country code.
);

$PayPalRequestData = array(
	'CreateAccountFields' => $CreateAccountFields,
	'Address' => $Address,
	'BusinessAddress' => $BusinessAddress,
	'PrinciplePlaceOfBusinessAddress' => $PrinciplePlaceOfBusinessAddress,
	'BusinessStakeHolder' => $BusinessStakeHolder,
	'BusinessStakeHolderAddress' => $BusinessStakeHolderAddress
);

// Pass data into class for processing with PayPal and load the response array into $PayPalResult
$PayPalResult = $PayPal->CreateAccount($PayPalRequestData);

header('Location: '.$PayPalResult['RedirectURL']);
?>
We can see the request parameters are split into separate sections the same way PayPal separates them in their documentation.
- CreateAccountFields – These are general fields that do not fit within any other specific group.
- Address – The user’s personal address should go here.
- BusinessAddress – The business address information goes here.
- PrinciplePlaceofBusinessAddress – In many cases, this would be the same as BusinessAddress. If the user has a primary headquarters, though, that would be an example of something to use here.
- BusinessStakeHolder – This is the personal information of a stakeholder in the business that you are including with the account.
- BusinessStakeHolderAddress – The address of the business stakeholder that you’ve included.
If you study the parameters in each section you’ll find it’s all pretty straight forward. The request is then passed through the library where it’s processed accordingly. A return URL is provided in the library result which is used to send the user over to PayPal to complete the process, at which time they’ll be presented with the following screen.
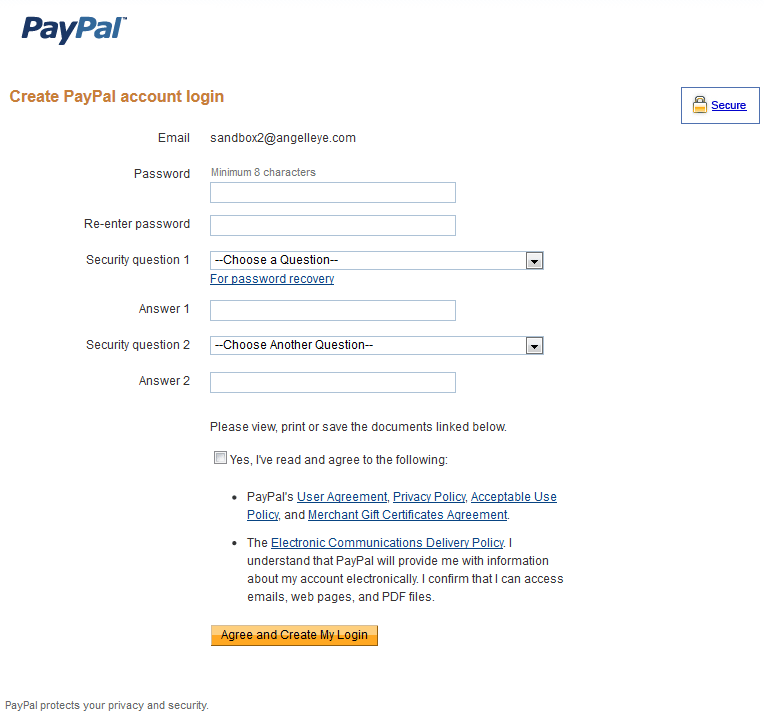
Once the user has completed this process they will be returned back to the ReturnURL specified in the request and you can allow the user to complete a payment with their new account or proceed with further actions on the account.
AddBankAccount API
In order for a user to become verified with PayPal and have access to more features they must add a bank account to their newly created PayPal account. This can be achieved through the PayPal.com website after signing in to the new account, or you can also tie this directly into your application using the AddBankAccount web service. Here’s a sample of doing exactly that with our PHP library.
<?php
// Include required library files.
require_once('../includes/config.php');
require_once('../includes/paypal.class.php');

// Create PayPal object.
$PayPalConfig = array(
	'Sandbox' => $sandbox,
	'DeveloperAccountEmail' => $developer_account_email,
	'ApplicationID' => $application_id,
	'DeviceID' => '',
	'IPAddress' => $_SERVER['REMOTE_ADDR'],
	'APIUsername' => $api_username,
	'APIPassword' => $api_password,
	'APISignature' => $api_signature,
	'APISubject' => $api_subject
);

$PayPal = new PayPal_Adaptive($PayPalConfig);

// Prepare request arrays
$AddBankAccountFields = array(
	'AccountHolderDateOfBirth' => '', // The date of birth of the account holder. Format: YYYY-MM-DDZ (ie. 1970-01-01Z)
	'AccountID' => '', // The ID number of the PayPal account for which a bank account is added. You must specify either AccountID or EmailAddress for this request.
	'AgencyNumber' => '', // For the Brazil Agency Number
	'BankAccountNumber' => '23421341234', // The account number (BBAN) of the bank account to be added.
	'BankAccountType' => 'CHECKING', // The type of bank account to be added. Values are: CHECKING, SAVINGS, BUSINESS_SAVINGS, BUSINESS_CHECKING, NORMAL, UNKNOWN
	'BankCode' => '', // The code that identifies the bank where the account is held.
	'BankCountryCode' => 'US', // Required. The country code of the bank.
	'BankName' => 'Bank of America', // The name of the bank.
	'BankTransitNumber' => '', // The transit number of the bank.
	'BranchCode' => '', // The branch code for the bank.
	'BranchLocation' => '', // The branch location.
	'BSBNumber' => '', // The Bank/State/Branch number for the bank.
	'CLABE' => '', // CLABE represents the bank information for countries like Mexico.
	'ConfirmationType' => 'WEB', // Required. Whether PayPal account holders are redirected to PayPal.com to confirm the bank account addition.
	'ControlDigit' => '', // The control digits for the bank.
	'EmailAddress' => 'sandbo_1204199080_biz@angelleye.com', // The email address of the PayPal account holder. You must specify either AccountID or EmailAddress.
	'IBAN' => '', // The IBAN for the bank.
	'InstitutionNumber' => '', // The institution number for the bank.
	'PartnerInfo' => '', // The partner informatoin for the bank.
	'RibKey' => '', // The RIB Key for the bank
	'RoutingNumber' => '101000010', // The bank's routing number.
	'SortCode' => '', // The branch sort code.
	'TaxIDType' => '', // Tax ID type of CNPJ or CPF, only supported for Brazil
	'TaxIDNumber' => '' // Tax ID number for Brazil
);

$WebOptions = array(
	'CancelURL' => $domain.'cancel.php', // The URL to which the user is returned when they cancel the flow at PayPal.com
	'CancelURLDescription' => 'Angell EYE Demo', // A description for the CancelURL
	'ReturnURL' => $domain.'return.php', // The URL to which the user is returned when they complete the process.
	'ReturnURLDescription' => 'Angell EYE Demo' // A description for the ReturnURL
);

$PayPalRequestData = array(
	'AddBankAccountFields' => $AddBankAccountFields,
	'WebOptions' => $WebOptions
);

// Pass data into class for processing with PayPal and load the response array into $PayPalResult
$PayPalResult = $PayPal->AddBankAccount($PayPalRequestData);

header('Location: '.$PayPalResult['RedirectURL']);
?>
Once again, the request is split up into different sections based on the way PayPal separates them in their documentation.
- AddBankAccountFields – General fields not specific to any other section.
- WebOptions – Placeholders for the Return URL and Cancel URL that the user should be returned to under each circumstance.
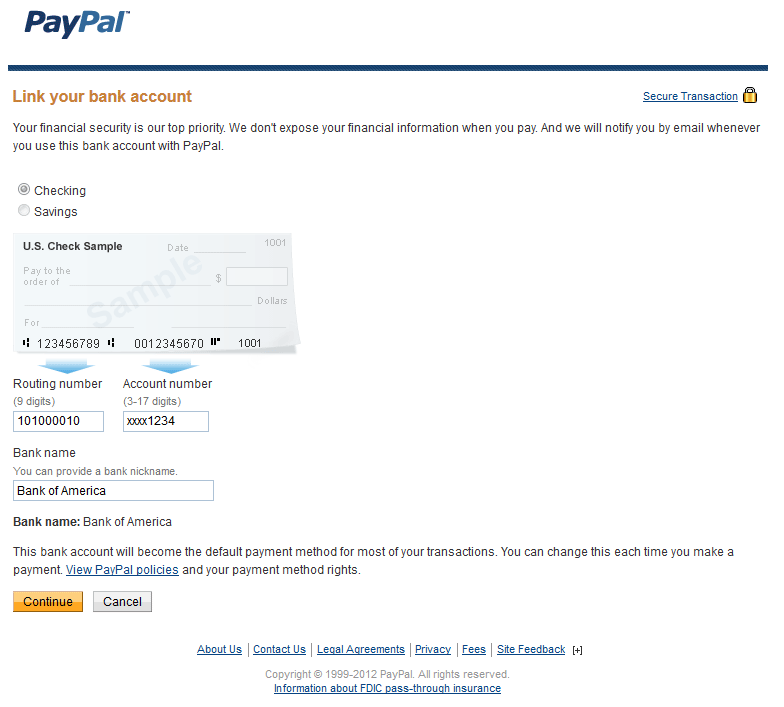
All of the request parameters are then passed into the library and we simply redirect the user to the returned URL where they will sign in to their PayPal account and see the following screen.
Upon reviewing the information and clicking the Continue button the user will be presented with this next screen.
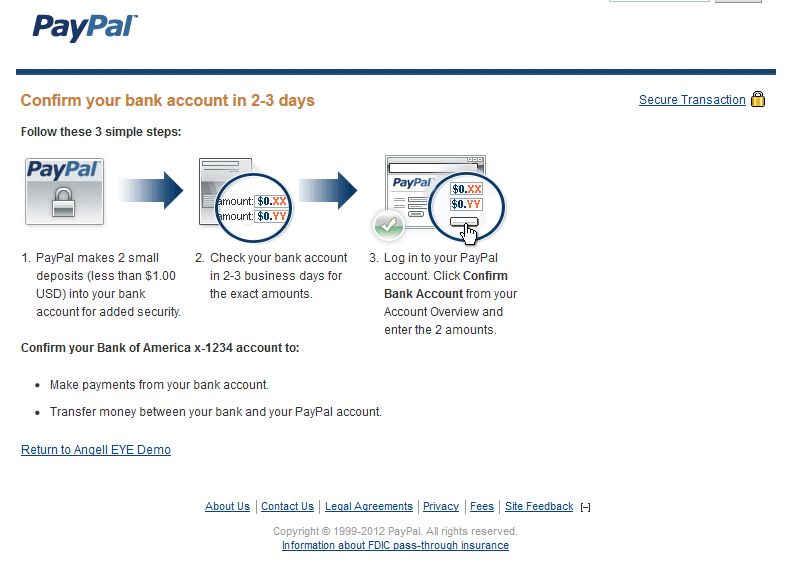
This informs the user of the verification process and provides a link to return your application.
AddPaymentCard API
The final step in creating a new account and preparing it for use is adding a credit card to the account. This allows PayPal to confirm that the address the user has on file matches the billing address of the credit card on file. If it matches, the risk involved with shipping items to this address goes down drastically, and sellers are better protected.
Once again, this can be done via the PayPal.com account interface or directly from the application using the API. The exact same procedure will be used, but this time we’ll use the AddPaymentCard web service. Here’s a sample of that.
<?php
// Include required library files.
require_once('../includes/config.php');
require_once('../includes/paypal.class.php');

// Create PayPal object.
$PayPalConfig = array(
	'Sandbox' => $sandbox,
	'DeveloperAccountEmail' => $developer_account_email,
	'ApplicationID' => $application_id,
	'DeviceID' => '',
	'IPAddress' => $_SERVER['REMOTE_ADDR'],
	'APIUsername' => $api_username,
	'APIPassword' => $api_password,
	'APISignature' => $api_signature,
	'APISubject' => $api_subject
);

$PayPal = new PayPal_Adaptive($PayPalConfig);

// Prepare request arrays
$AddPaymentCardFields = array(
	'AccountID' => '', // The ID number of the PayPal account for which the payment card is being added. You must specify either AccountID or EmailAdddress
	'CardNumber' => '4356803931287360', // Required. The credit card number.
	'CardOwnerDateOfBirth' => '', // The date of birth of the card holder.
	'CardType' => 'Visa', // Required. The type of card being added. Values are: Visa, MasterCard, AmericanExpress, Discover, SwitchMaestro, Solo, CarteAurore, CarteBleue, Cofinoga, 4etoiles, CarteAura, TarjetaAurora, JCB
	'CardVerificationNumber' => '', // The verification code for the card. Generally required for calls where ConfirmationType is set to NONE. With the appropriate account review, this param is optional.
	'ConfirmationType' => 'WEB', // Required. Whether the account holder is redirected to PayPal.com to confirm the card addition. Values are: WEB, NONE
	'CreateAccountKey' => '', // The key returned in a CreateAccount response. Required for calls where the ConfirmationType is NONE.
	'EmailAddress' => 'sandbo_1204199080_biz@angelleye.com', // Email address of the account holder adding the card. Must specify either AccountID or EmailAddress.
	'IssueNumber' => '', // The 2-digit issue number for Switch, Maestro, and Solo cards.
	'StartDate' => '' // The element containing the start date for the payment card.
);

$NameOnCard = array(
	'Salutation' => '', // A salutation for the card owner.
	'FirstName' => 'Tester', // Required. First name of the card holder.
	'MiddleName' => '', // Middle name of the card holder.
	'LastName' => 'Testerson', // Required. Last name of the card holder.
	'Suffix' => '' // A suffix for the card holder.
);

$BillingAddress = array(
	'Line1' => '123 Test Ave.', // Required. Billing street address.
	'Line2' => '', // Billing street address 2
	'City' => 'Grandview', // Required. Billing city.
	'State' => 'MO', // Billing state.
	'PostalCode' => '64030', // Billing postal code
	'CountryCode' => 'US' // Required. Billing country code.
);

$ExpirationDate = array(
	'Month' => '12', // Expiration month.
	'Year' => '2015' // Required. Expiration Year.
);

$WebOptions = array(
	'CancelURL' => $domain.'cancel.php', // The URL to which the user is returned when they cancel the flow at PayPal.com
	'CancelURLDescription' => 'Cancel and return to Angell EYE Demo.', // A description for the CancelURL
	'ReturnURL' => $domain.'return.php', // The URL to which the user is returned when they complete the process.
	'ReturnURLDescription' => 'Return to Angell EYE Demo.' // A description for the ReturnURL
);

$PayPalRequestData = array(
	'AddPaymentCardFields' => $AddPaymentCardFields,
	'NameOnCard' => $NameOnCard,
	'BillingAddress' => $BillingAddress,
	'ExpirationDate' => $ExpirationDate,
	'WebOptions' => $WebOptions
);

// Pass data into class for processing with PayPal and load the response array into $PayPalResult
$PayPalResult = $PayPal->AddPaymentCard($PayPalRequestData);

header('Location: '.$PayPalResult['RedirectURL']);
?>
Once again, our request parameters are split up based on the PayPal documentation just to keep things in order.
- AddPaymentCardFields – General fields that do not fit under any other group.
- NameOnCard – The name of the person associated with the credit card.
- BillingAddress – The address on file with the credit card company.
- ExpirationDate – The expiration date of the credit card.
- WebOptions – Information about where to return the user should they cancel or complete the process.
Just like with CreateAccount and AddBankAccount we’ll simply redirect the user over to PayPal using the returned URL. Once they sign in they’ll be presented with the following screen.
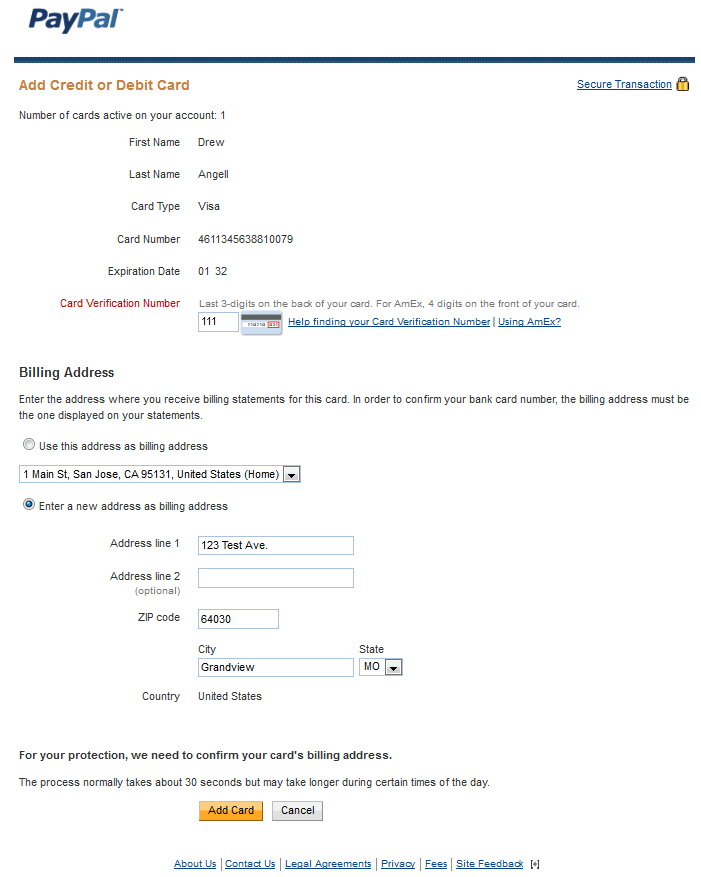
Upon clicking the Add Card button, they will see the following screen.
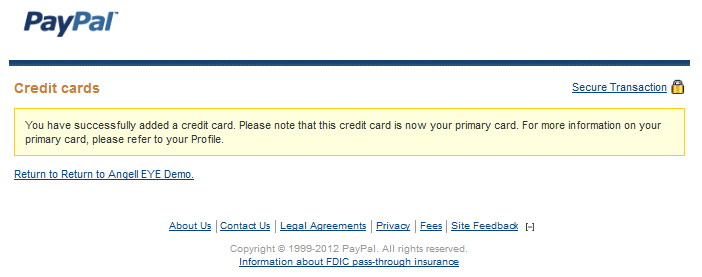
Here, they can continue within their PayPal account or they can click the link to return to your application.
Conclusion
Once these steps have each been completed the user will be ready to send and receive payments on the PayPal platform without running into any limitations due to a non-verified or un-confirmed account.
The ability to handle each task from directly within your application allows you to streamline this process and make it as simple as possible on the end user.
You may download the stand-alone PHP library and you may also download the specific samples used within the article in order to study everything a little bit more closely and get started on your own.
Have fun, and happy coding!
In adaptive method it is possible to delay a transfer of funds. We can be able to specify after how much delay the second payment should happen.
What I currently know is: we must define the delay like we defined 20 days. In this case we won’t be able to interrupt this timing again.
What I need is:
We have a seller buyer scenario.
Seller will send goods to buyer through courier.
when seller will ship through courier he will insert courier number with the Admin of the site. By having this courier number admin will be sure that the goods will be delivered to buyer and now seller should have the payment.
At this time can admin release the funds which would auto transfer after 20 days.
Is there any setting/method/function which we call and execute the second payment early?
Regards,
Saryu.
You would use the Pay API to submit the additional payment at that point.
a)Customer visits site and makes a purchase using their credit card (without leaving our site).
b)i want to implement the “adaptive payment” for payment to our site.
c)how to process the adaptive payment(without enter to paypal site).
If you want to completely avoid any redirect you’ll need to use Payments Pro or Payments Advanced. Adaptive Payments can be done in a lightbox so it looks more tightly integrated into your site/application, or you could also use Preapproval to provide the ability for your customers to do “one click checkout” type payments on your site.
how to do credit card payment similar to DoDirectPayment in Adaptive Payments
Unfortunately, this is not an option. Payers can pay with a credit card (guest checkout) but it’s going to happen on the PayPal page. You can’t hide it like you can with DDP.
i am karthik, junior programmer in xxx company .i have 1 year exp in php. i was successfully implement the adaptive payment(chain payment)in our site.but my client want do credit card payment similar to DoDirectPayment in Adaptive Payments(with out going paypal site, payment is completed )
my English is not good….
waitting for reply………………..
This cannot be done with Adaptive Payments, unfortunately. The best you can do is set it up using a lightbox so it’s tightly integrated into your site.
Hello karthik sir,
I am new for Paypal Adaptive chained payment method. i am not integrating this method in my site so please help me and send your complete php code on my email id : dev3@nakulsoft.net
i request to you please help me sir i try to integrate from last 10 days but not found any sample code. so please help me. i will wait your email. thanks in advance.
Were you able to get this resolved? There are samples for calls included in the /samples folder that comes with the library. Did you see those?
hi
paypal Delayed chained payments – I am application/shopping cart owner.
can delayed chained payment be automatically released to seller
if buyer confirms delivery – how to do it?
thanks
Hi Manny,
Sorry for the delay getting back to you. Yes, you would set a primary receiver (probably yourself) to receive the funds. This account would sort of act like an Escrow. Once you get the go-ahead to release the funds you would call ExecutePayment to submit the secondary payments accordingly.
Hi,
My Scenario is this when X buys P, Y should receive the full amount and after a certain period(it may be more than 90 days also), part of the amount has to be sent to Z. Which method can be used for this and how to do this. Kindly suggest please
A delayed chained payment would handle this for you, but you’re limited to 90 days on that. If you absolutely need to process payments outside of that period you’ll need to use Preapproval profiles.
developer is making our site and says we can’t do chain payments with his shopping cart. do you have suggetions? I saw something about ezchain, would that work? we host the website, vendors put their merchandise on the website we pay shipping and get a percentage then vendor gets paid when item is delivered and signed for? is this what I need for that to work? HELP!
What shopping cart is he using? You can make it work if the cart doesn’t have it already (which most don’t) but you’ll need to build a custom module/extension for it. Depending on the cart platform you’re using this can be done in various ways, but most are similar.
Currently am implementing the pay pal’s adaptive payment integration but i couldn’t pass the senders(buyer) mail through the action , then only I can get the buyer mail id to send the notification mail. I am using the your adaptive PayPal library files version 1.5 . And also I can’t able to run with latest version of composer error . Please help me ???
Please submit a ticket so we can work more directly on this together. Thanks!
It is possible to integrate deposit and withdrawl paypal system in php
Unfortunately, there are no APIs available to do that.
Hello Andrew Angell Sir,
i am a php developer and developed a eCommerce website. my client want to delayed chained payment method buti am not integrating it so please help me and provide me complete php code for this method if possible i am waiting your posistive response….thanks in advance
Did you take a look in the /samples folder that comes with the library? Do you have any specific questions about those samples?
Does this API allow me to pay money to my user, in my website user are allow to sell their products and we will pay them accordingly , is that possible with this API????
Any help would be greatfull!!!
Thanks in advance!!!.
Adaptive Accounts isn’t what you would want. If you’re working with Adaptive Payments then the Pay API is what you’d be after.
My website allow user to sell their product, we need a API that can be use to send money into customer’s account.
Is it possible with this API??
Any help would be greatfull!!!
Thanks in advance!!!
If you’re working with the Adaptive Payments APIs then you would need the Pay API specifically to send payouts to users of your site. Alternatively, you could set things up so the payments go directly to the vendor / product owner, and then the payout goes from their account to you for the commission.
Please tell me how can I get the include file config and paypal.class.php ..?
The library includes a config-sample.php that you can use. Just save-as config.php and fill it out with your own settings/values. Let me know if you have specific questions about that.
Hi Andrew Angell,
I am a part-time PHP programmer trying to learn to program a PayPal adaptive payment (chained and parallel) function into a website that I am trying to create. Can you suggest a book I can buy that will teach me (tutor) and provide the complete PHP code for both test and real examples?
Regards,
Terry
Actually, Adaptive Payments is a deprecated system and is no longer available. The functionality of Chained and Parallel can be completed with Express Checkout APIs. We have a basic demo kit for Express Checkout that would be a good starting point. I also have one for parallel payments that simply adds an additional payment into the kit I linked to, but it’s not yet packaged up and ready for sale. I could give you some general guidance on that if you have any questions about it after looking at the general demo kit. Chained payments with Express involves the use of Billing Agreements, and again, we have kits for those but they aren’t quite ready yet.
If you’re interested you could submit an order for general consulting, and I could include the basic demo kit with that and show you how it all works. We could also discuss parallel and chained at that time.
I am a part-time PHP programmer. I have created and programmed a third-party website in PHP that brings together sellers and buyers of new and used specific products. The website allows anybody (after becoming a seller member of the website with a PayPal account) to freely post product(s) for sale and a different person (buyer) to purchase the posted product.
The buyer can pay using a PayPal allowed credit/debit card or using standard PayPal (if they are a PayPal account member). My website passes 90% of the posted sales price (including sales tax collected and seller’s shipping cost) to the seller. I keep 10% of the sales price (includes 7% commission plus PayPal fee of 2.9% plus $0.30 per item sold).
At present, the website enables the buyer to pay me 100% of the sales price (includes sales price, sales tax, and shipping cost). The PayPal fee of roughly 3% is charged to my PayPal account. Next, I need to pay the seller 90% of the purchase cost (plus the sales tax collected and shipping cost) and pay PayPal a roughly 3% fee. I keep the remaining 7% as my commission. I also use IPN to capture and record in a MySQL database the PayPal information sent back to my website.
After reading about PayPal “Chained” Adaptive Payments in Google searches, I was planning to include the chained payments method to (1) make the seller the primary receiver of 90% of the payment including the sales tax and shipping cost and (2) make me the secondary receiver of 10% of the payment and responsible for the PayPal fee of approximately 3%.
Per your response to my post, you indicated that PayPal Adaptive Payments is a deprecated system and is no longer available. However, the functionality of Chained and Parallel Payments can be completed with PayPal’s Express Checkout APIs. Your basic demo kit for Express Checkout would be a good starting point.
Question: Would your basic demo kit for $24.99 allow me to program and incorporate the above functions that I described into my existing website program? Are all the PHP programming code and steps in your kit documented in detail and fully described?
The basic demo kit available on the site now would show you how to integrate Express Checkout in general, but it does not specifically do any sort of a payment split. I just recently posted an article with the basic info about how to get this done with Express Checkout. Check it out here.
Hi Andrew,
Did you receive my detailed response that described my website program situation?
Regards,
Terry
Yes, I responded to it. You didn’t see the response..??
is it possible to use Paypal Adaptative Payment Api with wordpress site in which woocommerce it not used, Actually in my site there are some users image and those images are sell as product and on that process split payment will follow. So on “buy now” button click i want split payment
Yes, you could do that no problem. However, Adaptive Payments is no longer available for new merchants. If you’re okay with a Parallel Payment you could get that done with the Classic Express Checkout API. If you need Chained, that’s not going to be available specifically, but you could follow these guidelines to come up with a work-around.
Hey i have an issue with intgrate paypal on my website.I need application id to add paypal.
where i get applcation id. i will try and implement client id but it will throw that error.The X-PAYPAL-APPLICATION-ID header contains an invalid value.
Please give me the solution it is very urgent.
Adaptive Payments is no longer available for new merchants, so you will not be able to get a live App ID. You’ll need to use a different solution.