Introduction
Of all the PayPal API’s I’ve worked with over the years, I have to say that the Permissions service has been the most time saving, and in turn, cost saving, service that I’ve used…and I’ve used them all.
In this article, I’d like to explain that bold statement. First, we’ll discuss how permissions work within the PayPal platform. Then we’ll take an up close look at the steps involved to setup these permissions using two separate methods:
- PayPal Account Profile
- Permissions API
- We’ll be using the Angell EYE PHP Library for PayPal in order to quickly and easily setup these Permissions API calls.
What are PayPal Permissions, and How Do They Work?
This is an important concept to understand, and while it’s simple, it’s often something that seems a little bit tough to grasp for people while trying to build applications for the PayPal platform. Simply put, permissions allow your application to make API calls on behalf of a particular PayPal account. This is known as authentication, or approval.
Over the years this process has gotten easier. When the PayPal API’s were first launched, the only option was to generate an SSL certificate and install that on your server. This was a tedious and confusing task, and PayPal responded by releasing the “signature method” of authenticating applications. This is much quicker and easier, and is now the recommended method. With this method, you simply include three parameters in your API requests: USER, PWD, and SIGNATURE.
In many cases you will be implicitly approving your application by using API credentials pulled from the same PayPal account that you’re making calls for. For example, if you’re building your own website and you need to accept payments you’d use the API credentials from your own PayPal account. If you were building a website for a client of yours, you’d pull the API credentials from their PayPal account. In both cases, the interaction with PayPal will be for the same account that the credentials were pulled from.
This is generally pretty quick and easy for developers to find and configure for themselves or for clients. Where things get interesting, though, is when you build a single application that will be used by lots of different PayPal account holders to send and receive money, look up transaction history, etc.
In such cases you can provide one of two options (or both) to your user:
- Provide fields within your application for the user to copy/paste their own API credentials, and then pull these values for API calls accordingly.
- Have the user “Grant API Permissions” for your API username to make calls on their PayPal account’s behalf.
Let’s take a closer look at each of these options.
Obtaining API Credentials or Granting API Permissions via the PayPal Account Profile
The steps involved with retrieving API credentials out of a PayPal account or granting API permissions for a 3rd party to make calls on your account’s behalf are similar. There’s just a small fork in the road depending on which option you’re using for authentication.
First, let’s take a quick look at obtaining API credentials for your own PayPal account or a client’s account. I’ll be using a sandbox test account to complete these steps and provide screen-shots along the way.
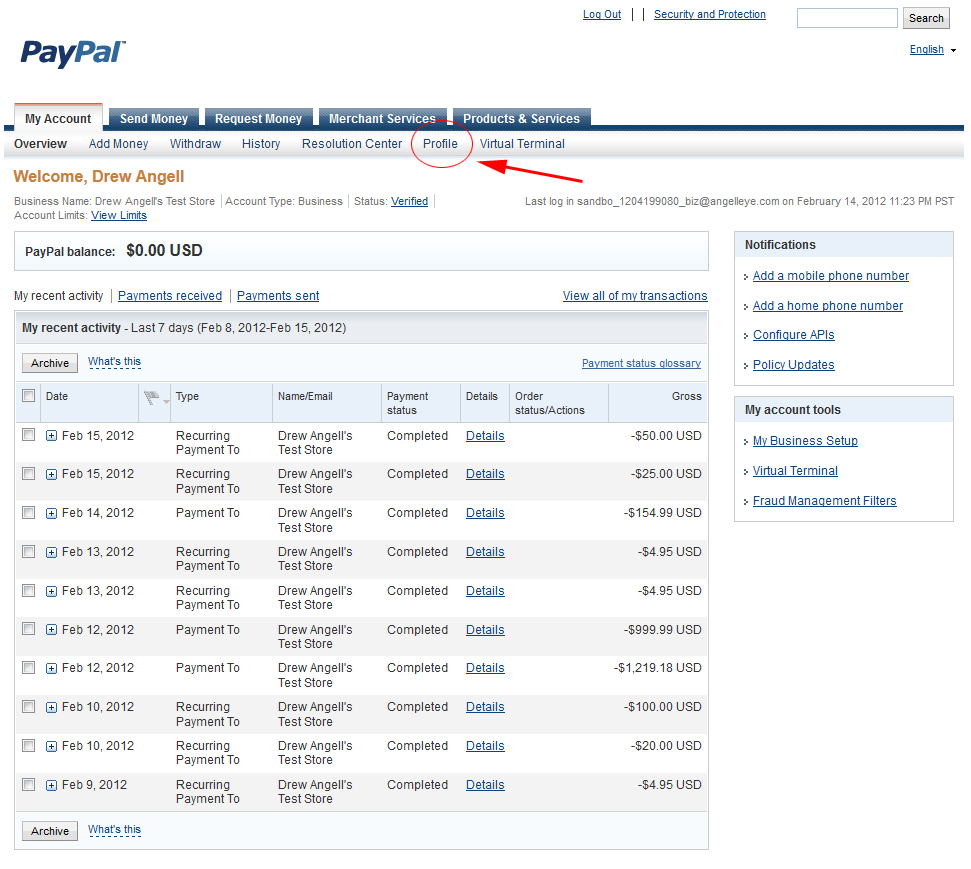
First, sign in to your PayPal account and click on the Profile link.
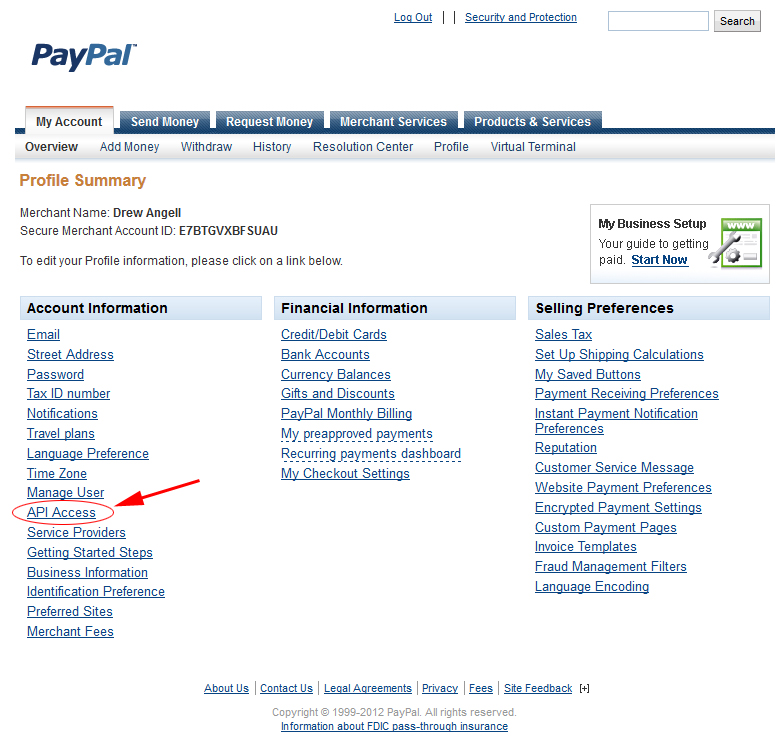
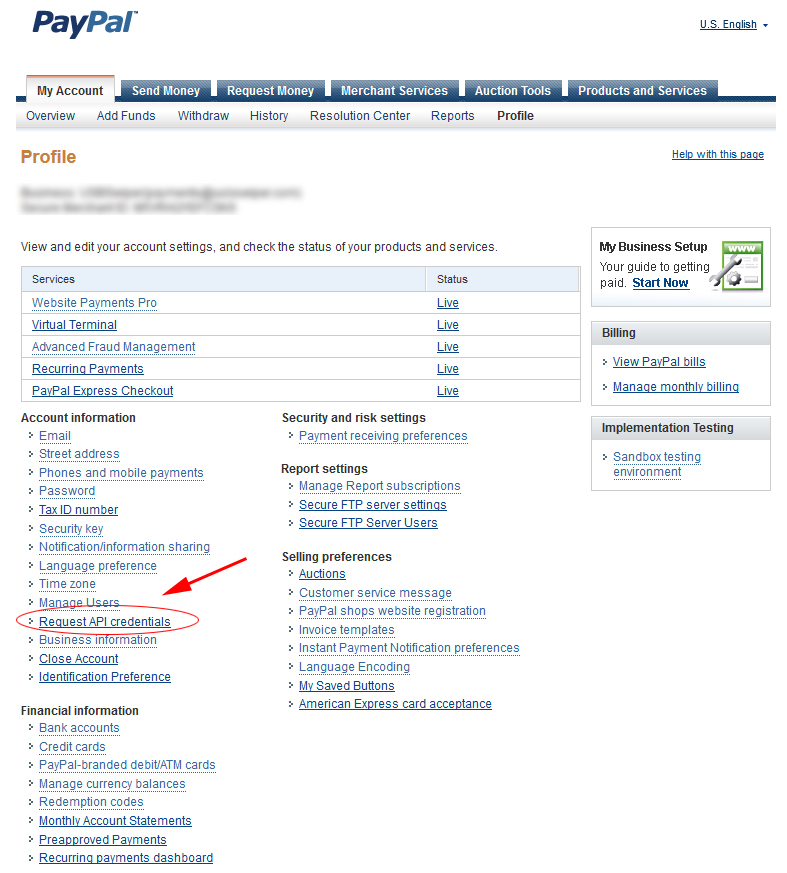
Next, depending on what version of PayPal your account is currently running on you’ll see one of two things: API Access, or Request API Credentials.
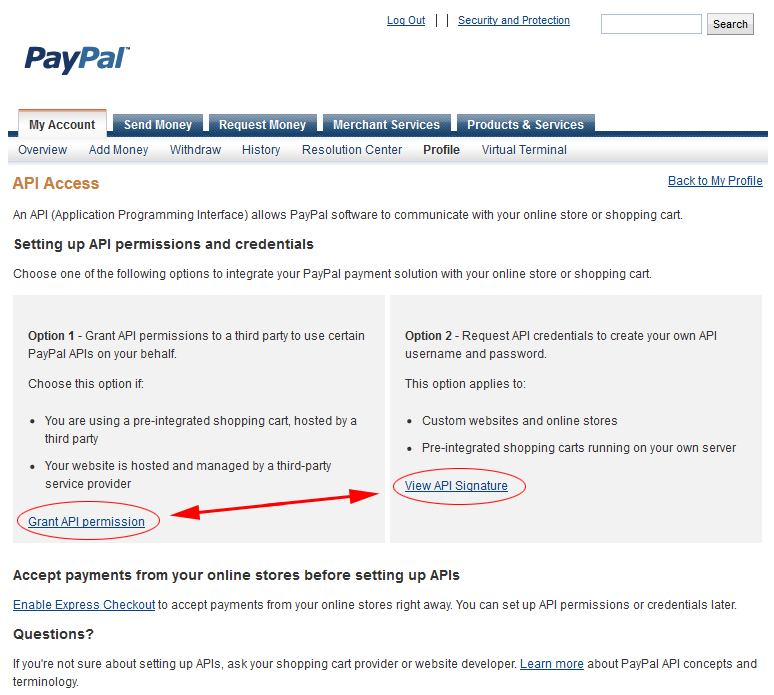
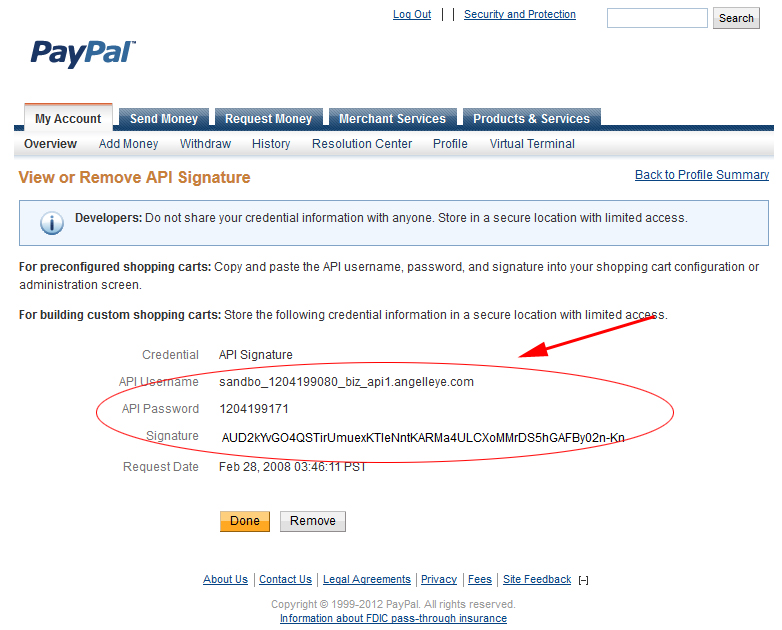
In the following screen, click the link to View API Signature under Option 2. This is the fork in the road I mentioned previously. Later we’ll revisit this and choose Option 1. Another thing to note here is that if you’ve never created signature credentials for the PayPal account the verbiage for this option will be slightly different and will instruct you on creating the credentials.
Upong clicking the View link (or creating fresh credentials) we will be presented with the following screen which displays our API credentials. At this point we would copy and paste these credentials into our application accordingly for implicit approval.
Now let’s consider an application that you’ll be distributing it to lots of people, but you don’t want them to be forced to create their own API credentials and copy/paste those values into the solution. Instead, they can grant the application permissions to make calls on their behalf.
The process your users will follow is the same as above, except that in Step 3 they will chose Option 1, and click the Grant API Permission link shown previously. At that point you will be presented with the following window.

You will provide your API username to your user, and they will enter this into the Third Party Permissions Username field and click the Lookup button, which will display all of the options with check boxes. You will need to instruct your user on exactly which options they need to enable in order for your application to complete its tasks. Based on the options we’ve checked here, our application will have access to the following API’s:
- SetExpressCheckout
- GetExpressCheckoutDetails
- DoExpressCheckoutPayment
- GetPalDetails
- Refund / RefundTransaction
- DoDirectPayment
- DoAuthorization
- DoCapture
- GetBalance
- GetTransactionDetails
- CreateRecurringPaymentsProfile
Once all of the options are selected here, clicking Add will display the following.
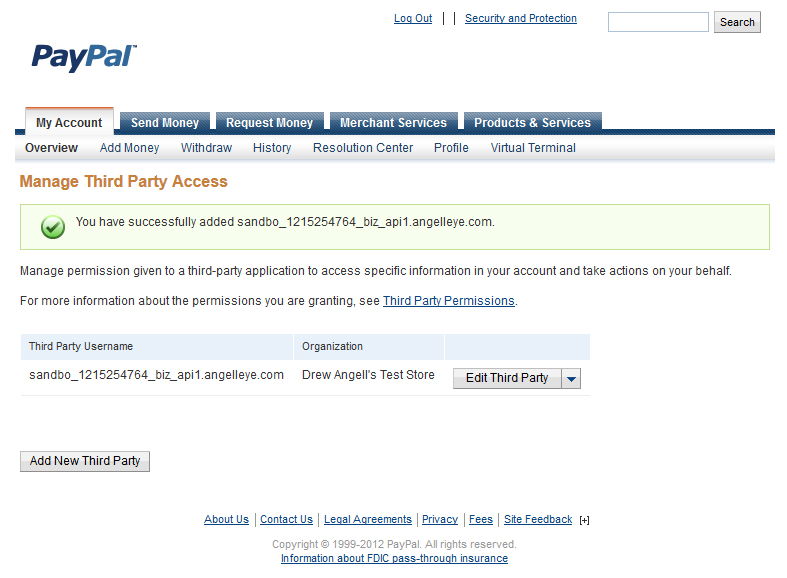
Now we can see that we have successfully added the third party API username into this PayPal for access to all API’s that we enabled in the previous step.
At this point, within your application you will use your own API username, password, and signature, but you will include an additional parameter in your API requests called SUBJECT. The value for this parameter will be the PayPal email address or account ID of the user you’re making the call for, and of course the request will only be successful if that user has followed the steps above to grant your application permission.
As you can imagine, this process can be somewhat of a nightmare if you’ve got hundreds or thousands of users. Many will be able to follow along with documentation that you provide, but many will not, and you will end up spending hours on the telephone with customers who need help getting your software to work. The Permissions API will eliminate this problem for us.
Granting API Permissions via the API
Everything explained previously is still available, of course, but PayPal now provides a much smoother process for users to approve an application. All they have to is click on a link or a button somewhere to trigger the approval, and then simply sign in to their PayPal account, click agree, and they’re finished. It’s up to you as the developer to ensure that you’re taking advantage of this API to make things easier on your customer and save you loads of time.
Let’s take a look at exactly how we’ll do that. This example will be completed with PHP and will utilize the Angell EYE PayPal PHP Library that you may be familiar with if you’ve read my previous articles. If not, you may want to check out that article as I won’t be explaining too much here about exactly how to configure the library.
We’re going to build the API calls necessary to provide our users with this ability, and then we’ll go through the user experience to see exactly what it all looks like when it’s done.
To set this up we’ll be using the SetAccessPermissions API. As such, I’ll open up the SetAccessPermissions.php file that is included with the library, and populate the request parameters accordingly. Here is a look at our completed script.
// Include required library files.
require_once('includes/config.php');
require_once('includes/paypal.class.php');

// Create PayPal object.
$PayPalConfig = array('Sandbox' => $sandbox,
		'APIUsername' => $api_username,
		'APIPassword' => $api_password,
		'APISignature' => $api_signature
	);

$PayPal = new PayPal($PayPalConfig);

// Prepare request arrays
$SetAccessPermissionsFields = array(
	'ReturnURL' => $domain.'paypal-permissions/return.php',
	'CancelURL' => $domain.'paypal-permissions/cancel.php',
	'LogoutURL' => $domain.'paypal-permissions/logout.php',
	'LocalCode' => '',
	'PageStyle' => '',
	'HDRIMG' => $domain_ssl.'/images/tutorials/paypal-permissions/angelleye-clients/cpp-header-image.jpg',
	'HDRBorderColor' => '',
	'HDRBackColor' => '',
	'PayFlowColor' => '',
	'InitFlowType' => '',
	'FirstName' => '',
	'LastName' => ''
);

$RequiredPermissions = array(
	'GetBalance',
	'RefundTransaction',
	'GetTransactionDetails',
	'GetExpressCheckoutDetails',
	'SetExpressCheckout',
	'DoExpressCheckoutPayment',
	'DoCapture',
	'DoAuthorization',
	'DoReauthorization',
	'DoVoid',
	'DoDirectPayment',
	'CreateBillingAgreement'
);

$PayPalRequestData = array(
	'SetAccessPermissionsFields' => $SetAccessPermissionsFields,
	'RequiredPermissions' => $RequiredPermissions
);

// Pass data into class for processing with PayPal and load the response array into $PayPalResult
$PayPalResult = $PayPal->SetAccessPermissions($PayPalRequestData);

if(strtoupper($PayPalResult['ACK']) == 'SUCCESS' || strtoupper($PayPalResult['ACK']) == 'SUCCESSWITHWARNING')
{
	header('Location: '.$PayPalResult['REDIRECTURL']);
	exit();
}
You can see here that we’re able to provide URL’s for where the user will be redirected if they complete the process, if they cancel the process, or if they simply logout of their PayPal account prior to completing the process.
We’re also setting a HDRIMG, which is a logo we’d like to be displayed on the PayPal login page.
Finally, we’re adding all of the API’s that we need access to into the $RequiredPermissions array. This informs the API that our application requires each of API calls listed.
Now all we need to do is upload our new SetAccessPermissions.php and attach it to a button or link for your user to click on and start the process.
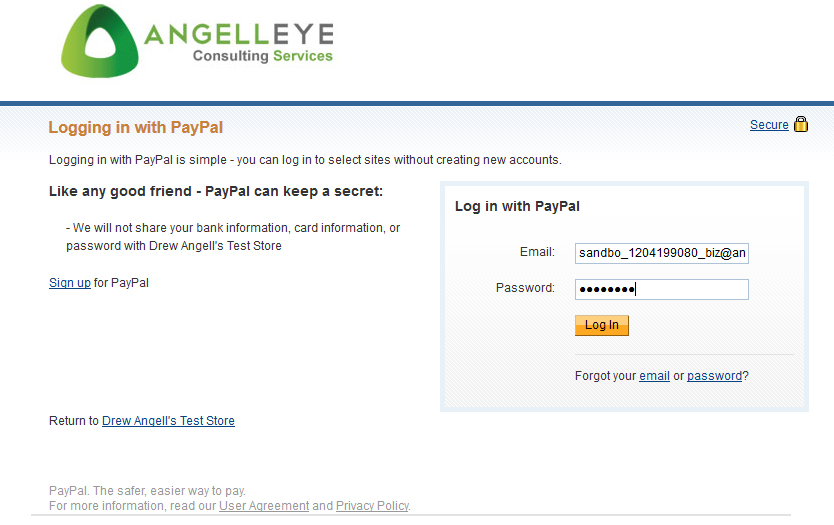
The API works very similar to SetExpressCheckout in that upon a successful result you will get a token with which to append to the URL you redirect the user to. The library handles that for us, though, so as you can see in the code we simply use $PayPalResult[‘REDIRECTURL’] for our redirection. The result is that the user is presented with a PayPal login screen.
Once the user has signed in, they will be presented with an outline of the required permissions that your application is requesting.
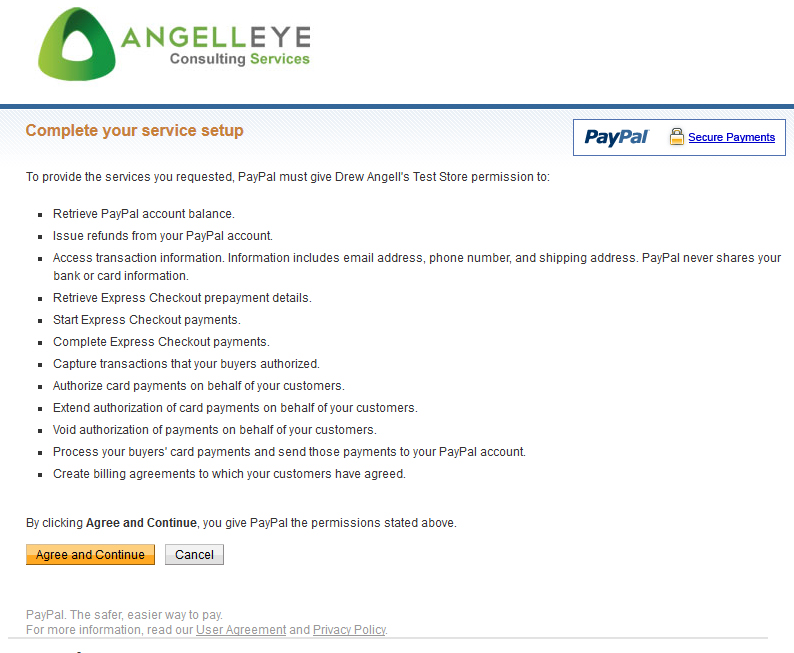
Upon clicking Agree and Continue, the user will be sent back to the URL provided in ReturnURL in our SetAccessPermissions.php previously. For the purposes of this example I’m simply displaying a basic success message that we see when we’re all done with the process.

As you can see, this user experience is a lot quicker and easier than going through the PayPal account profile. This will virtually eliminate your support emails and calls from people that need help approving your software, and in turn save you time and money.
Again, you can now use your own API credentials within your application and simply provide the users PayPal email address or account ID in the SUBJECT parameter of your API requests.
Conclusion
As you can see, there was an awful lot to cover with such a simple procedure. While developers can handle these steps with relative ease, end users are often confused and frustrated and will end up contacting you for support if they don’t just give up entirely.
The Permissions API is the saving grace that eliminates this bottleneck for customers and directly affects your bottom line. It’s extremely simple, and extremely effective, which is why it’s one of my favorite PayPal web services.
This sample project can be downloaded for your review, and you can also download a copy of the PHP Library for PayPal that was used so you have the complete solution.
Happy coding!
I am not sure if this is still current.
I am wishing to grant permission to an app (with multiple users) so that on behalf of each user, the app will process a payment through PayPal’s Express Checkout and send payment to a user’s account.
Is there a more up to date tutorial for using this library to accomplish such a task. I am getting so far, I am being returned to a call back response page that I have set, but I am not understanding how to return / use the username, password and signature that I assume PayPal is sending back.
Do you have a link to clarify this?
Kind regards
Andrew
If you simply want to setup Express Checkout to send payments to a 3rd party account you do not need to mess with Permissions. You just use your own API credentials in the API requests, and you use the SELLERPAYPALACCOUNTID parameter to specify the PayPal Account ID / Email Address of the account you’d like the funds sent to. Let me know if you have any specific questions about that. I actually have a demo kit available for this, but it’s not published on my site yet. It will be a $25 demo kit. If you’re interested you can send a PayPal payment directly to paypal@angelleye.com and I can get that delivered do you directly.